Home Products About Me Classroom Freebies Teachers Pay Teachers Pinterest Email Instagram Facebook Twitter Image Map

August 1, 2016

Getting That Spanish Classroom Ready


Today is August 1, which was a little bit of an unwelcome arrival because I feel like I'm just one month away from fall.  On the other hand, August brings all of the back to school excitement that I love. While I know many of you are busy getting your classrooms ready for school this week or later this month, school in Michigan doesn't start until after labor day, which means I still have just enough time to start planning how I'm going to decorate my classroom this year. 

I'm kind of obsessed with classroom organization and decor and I love revamping and changing things every year.  Here's what my classroom looked like last year and a few photos of my favorite decor features.

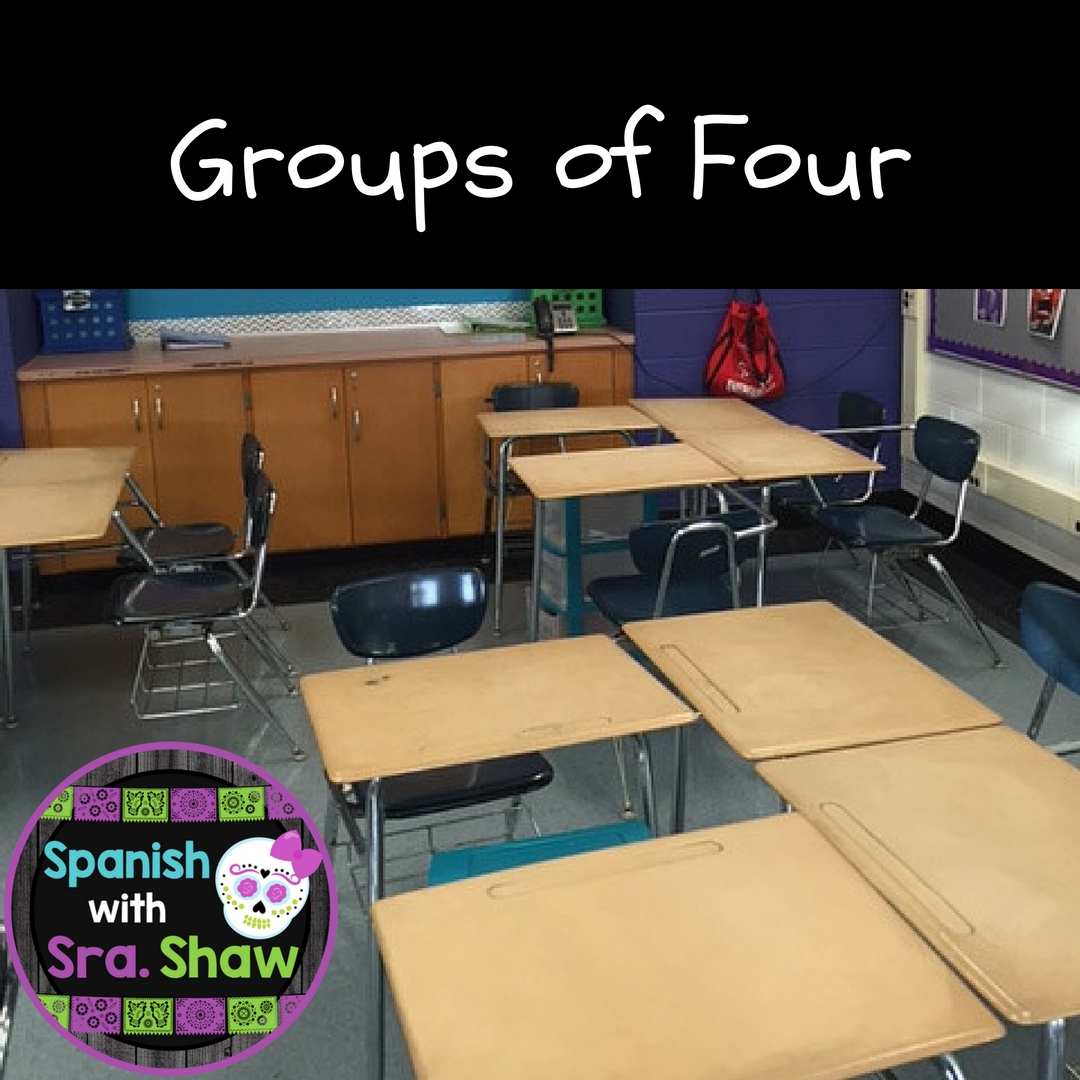
Seating Arrangement: 
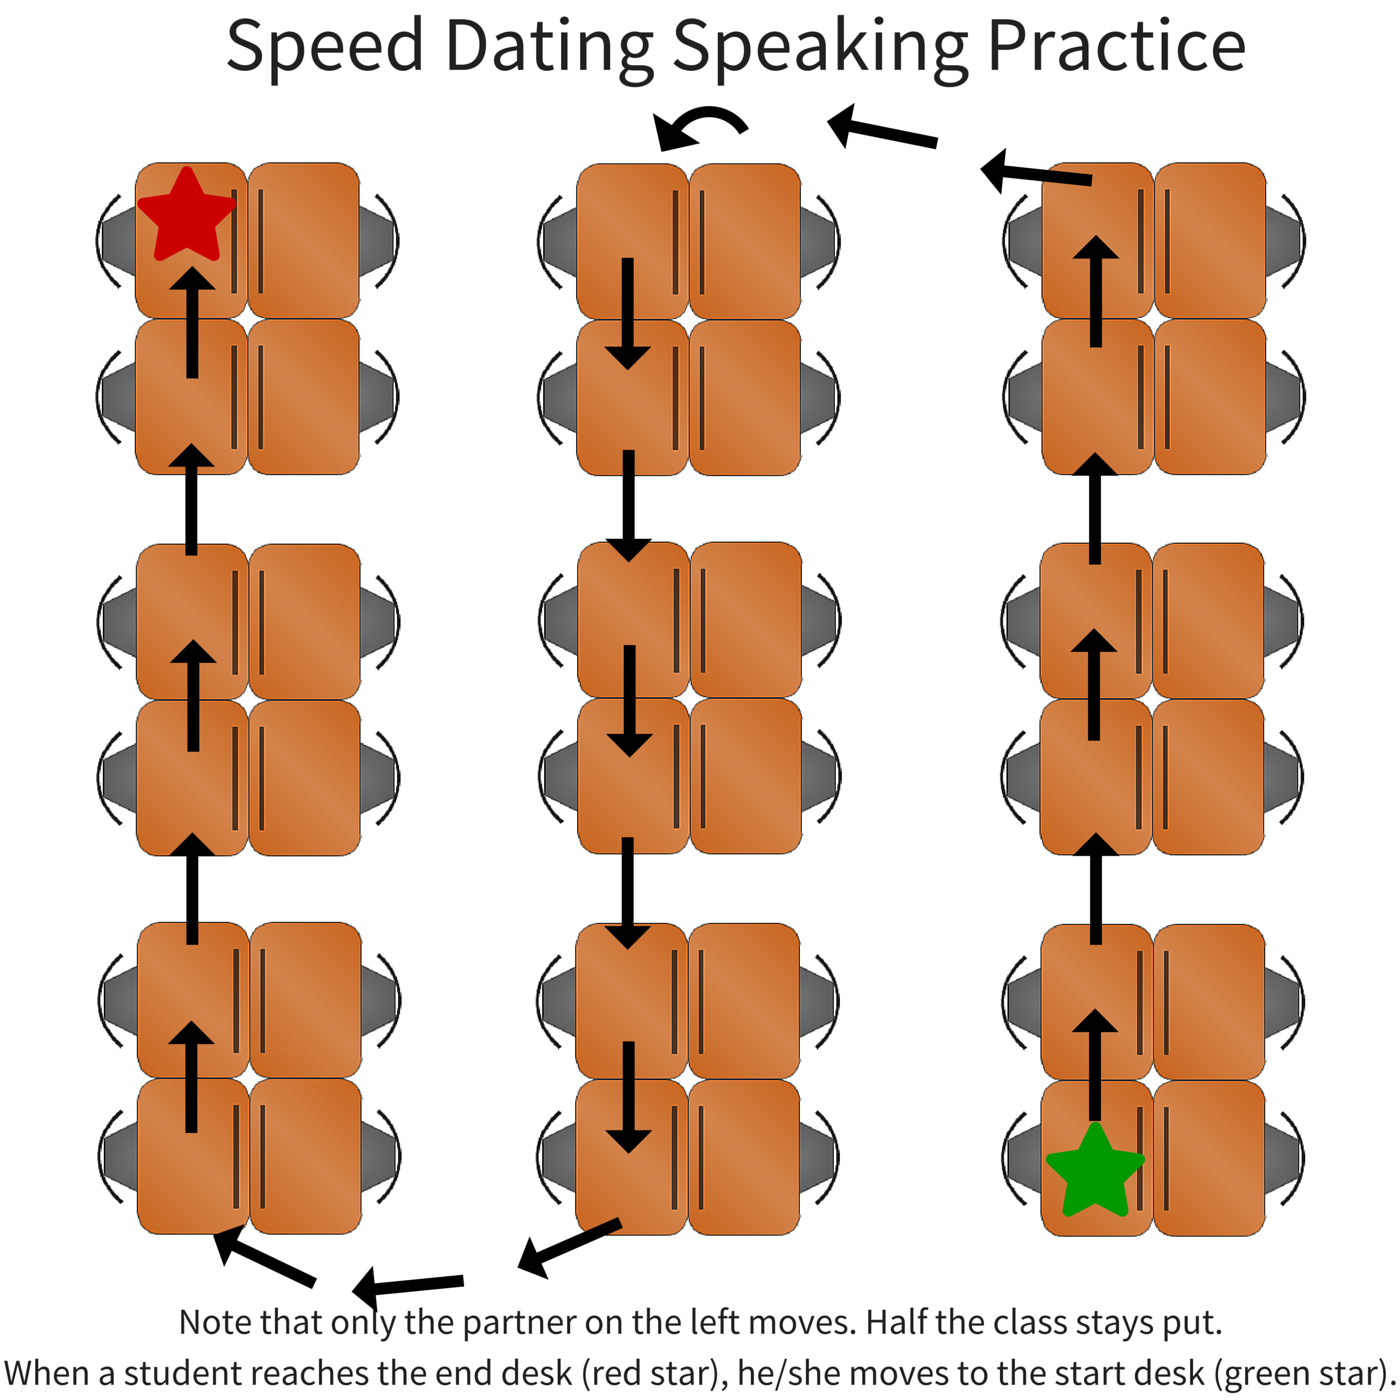
After playing around with seating arrangements for about a decade, I now have have my desks arranged in groups of four and I love it for the purposes of interpersonal speaking.  I can quickly pair kids by side partner or across partner so that they don't get bored of working with the same person.


Bulletin Boards:
Most of my classroom decor revolves around the six bulletin boards I have the pleasure of covering each year. Finding decor was daunting my first year, to say the least, but now I have it down to a rotation that I change out every 3 or so years to keep it interesting for the kids since I teach many of my students for all of middle school.

Here are some of my most recent bulletin boards:

  • EdTech Tools Bulletin Board Printables Set
    • I designed these last summer as a way to get my kids using different educational technology tools in their Real World homework choice assignments. They look whimsical and I had good feedback from kids that they liked using a lot of the apps. 
  • Text Lingo Bulletin Board Set
    • I found a pin last summer about Spanish text lingo and decided that it would make such a fun and engaging bulletin board for my students. Plus, it doubles as a fast-finisher activity for my more advanced kiddos because they can try to figure out the meaning of the texts.
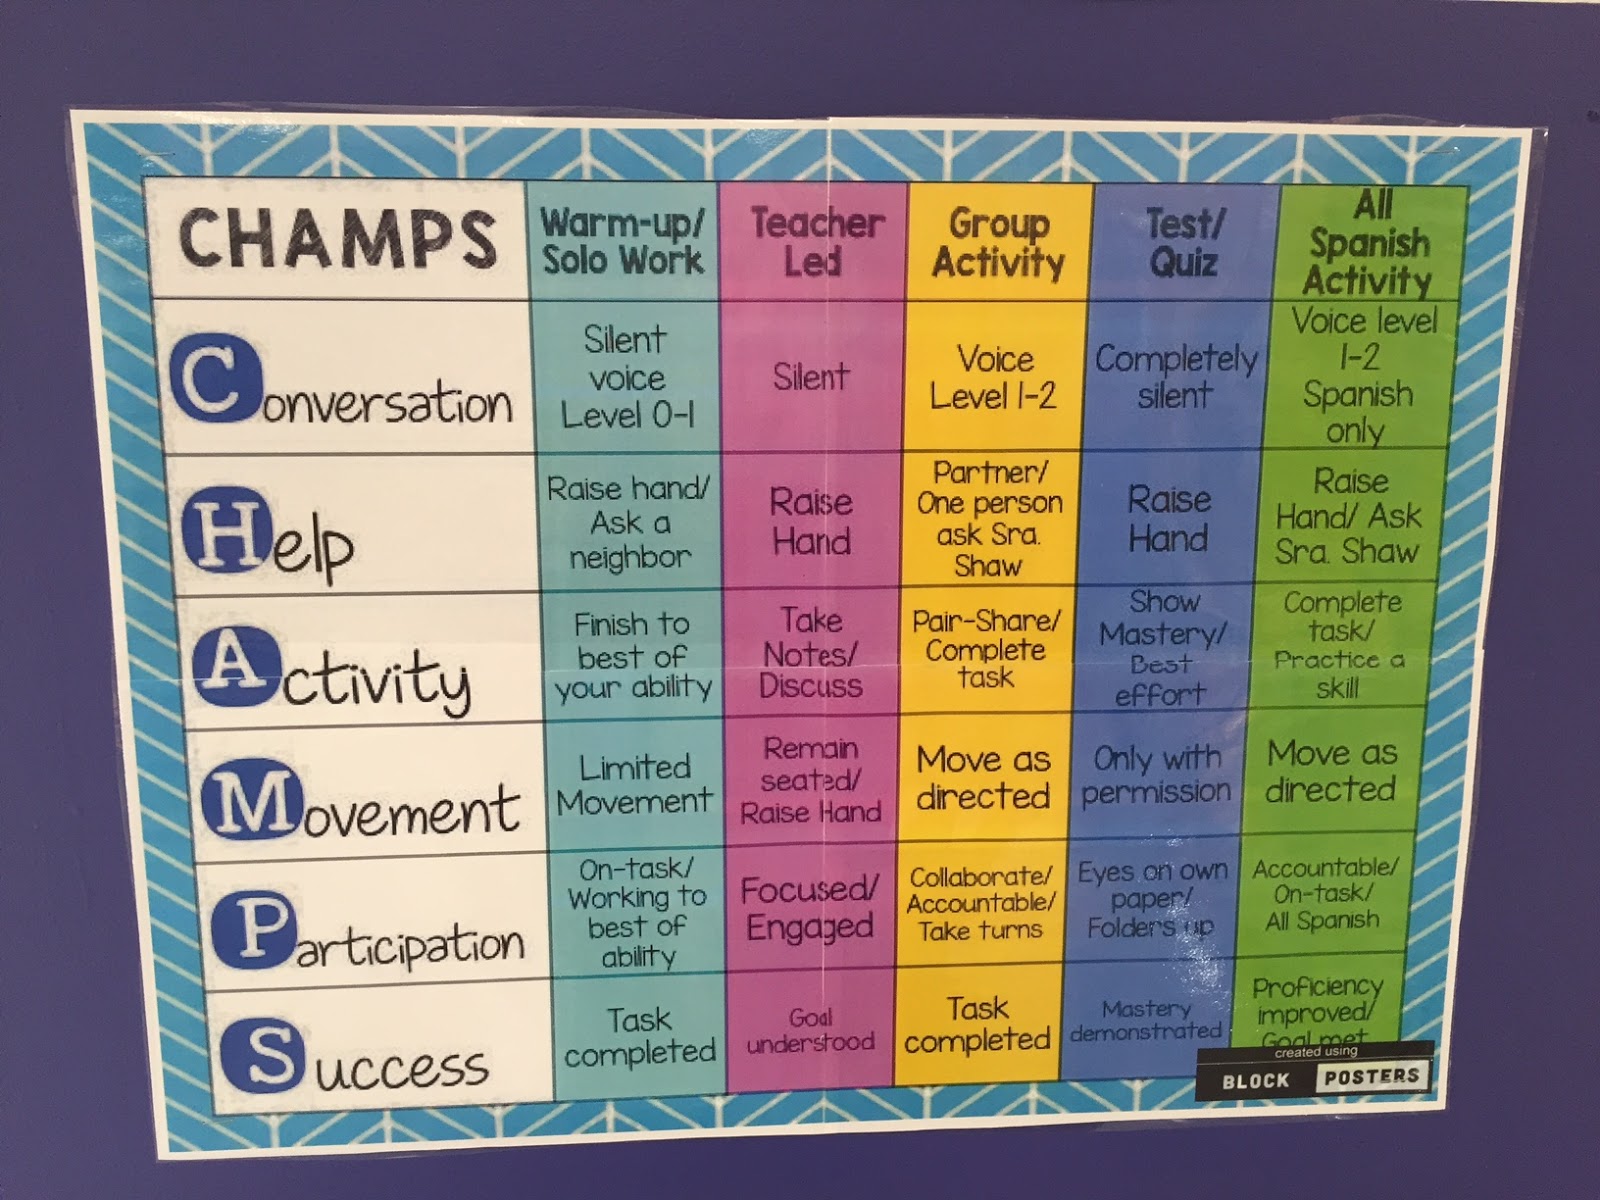
  •  CHAMPS classroom management grid
    • At my last district, I attended a training about CHAMPS, which is a classroom management approach that I love. It seriously changed the way I approached explaining expectations for activities to my students.
  • I love this word rejoinders bulletin board from Amy Lenord.  Since the highest level I teach is Spanish I for 8th grade, I think I'd like to to rework the categories and the terms used, but I think her idea is genius. Even though I referenced it throughout the year, I found almost none of my kids used it, so I'm thinking the terms are a bit advanced. I'd like to add categories for common classroom commands and courtesy phrases.

  • Inspired by all of the Path to Proficiency posts from last summer, I made this bulletin board last summer and I found myself actually referencing it in lessons so students could see my expectations and the language progression I was looking for. My Spanish I kiddos, in particular, found it motivating to see themselves improving. 

  •  I have used the interrogative (question) words printables from the Creative Language Class for the last several years, but I'm so excited that they've put out an updated version! Hurray for cute posters!
So, while I won't be able to be in my classroom for a few weeks because my building isn't yet opened to us, I hope that these ideas will be motivating to those of you headed back sooner than I. ¡Hasta pronto!

July 20, 2016

How to Create and Give Ipas: Part 6: The Presentational Task

From what I've seen, the presentational task is the most easily understood of the three IPA assessments.  I think this is because as teachers, we inherently have our language students write and occasionally present. Since most people already have a pretty good idea of what the presentational mode is, my goal for today's post is to share some hopefully new, or at least motivating ideas of some different ways to approach this task. 

But first, a few things about the presentational task.  This assessment can be either written or spoken or combined to have both, which is my personal favorite. Presentational speaking can be done in person or digitally performed. This is one area where I think almost anything goes.  I always aim to create a real-world reason for doing the task in the first place and to use a clear rubric with detailed descriptors.

After a few years of toying with different rubrics, I've finally adapted two by blending and adjusting one of Laura Terrill's presentational rubric and a Ohio Department of Education novice-mid rubric. While it takes a while to get comfortable using a rubric and it typically requires some tweaks for future assessments, here are the grading categories and goal descriptors for the rubrics I'm currently using for Spanish I.


Here are a few examples of various longer summative presentational assessments I've given as part of IPAs. I tend to do presentational projects every other unit and incorporate a different ed tech tool each time. I always provide pre-writing graphic organizers for these as they tend to help students feel less overwhelmed and more clear about the task at hand.


Below is an example of a student's family project:


Here is an example of a project dealing with likes and basic personal descriptions:

Finally, here's another example of a student presentation for a gustar unit reviewing personal descriptions:


For shorter writing assessments as part of my IPAs, the prompts tend to look more like the one below.
I think it's important to try to mix up presentationals as much as possible and to use them to give students voice. While kids will gradually learn to have fun with interpersonal speaking assessments, it's the presentational assessments, especially the projects, that kids will remember about our classes. I still remember the projects I did for my own high school Spanish classes. So be creative, let the kids have play with the language, and express themselves as much as possible.

May 18, 2016

How to Create and Give IPAs: Part 5: Managing an Efficient Interpersonal Task


Anytime I hear the concept of the interpersonal task introduced to a teacher who is unfamiliar or at least has not tried it in the classroom, there is a ton of resistance. I totally get it! I was the same way when I first learned about interpersonal speaking assessments.

Here are just a few of the concerns I've heard teachers discuss (with some help from my amigas on the Spanish Teachers in the US Facebook page) and then I'm going to address the primary concerns in a moment.


Concern #1: It takes way too much time to assess speaking.
This is probably the most common concern that teachers have about the interpersonal task.  For most of my teaching career, I agreed though I forced myself to do interpersonal speaking assessments, but hated it. I use to find listening to students speak be one of the most time-consuming, mind-numbing activities I ever had to do as a teacher. Thankfully, that has changed and I now thoroughly enjoy them. More about that later along with tips to get through 30 students' speaking tasks in one just one class period. It can be done.  I promise.

Concern #2: What do you do with the rest of the kids while I'm testing students?
Typically, I focus my complete attention only on the students speaking while the other 28 run around like wild animals. Kidding! I usually have students take the interpretive reading and/or presentational writing portions while I listen to students speak and grade them. I honestly works perfectly.  Sometimes students work on projects (usually an extended presentational task) or learn their new unit vocabulary online while I grade.  Once you set the expectations for how students should behave during the interpersonal and reinforce them, it really goes very smoothly.  I think you just need to have an individual task that can be done silently and independently and you won't have any issues.

Concern #3: My kids aren't yet able to have those kinds of conversations. 
I'm a believer that even my 6th graders can perform an interpersonal task if the expectations are appropriate. However, if your students haven't practicing interpersonal conversations or teacher-based question and answer activities beforehand, they probably won't be able to have a thorough conversation. I found that when I went with my current model for interpersonal tasks, I really had to change my teaching practices to include more daily conversation. If this is your primary concern, I'd love it if you could read yesterday's blog post for a bunch of tips and tricks to preparing students for the interpersonal speaking task. 
 
So, what does my model for interpersonal speaking assessments look like? In the past, I would call a student up to my desk and the two of us would have a conversation. I've heard of some teachers doing them in the hall, which sounds a little scary for a classroom management fanatic like myself.  My old way took forever and I apparently didn't clearly explain what the rest of the students were supposed to do because, in short, it was a chaotic nightmare.

I'm happy to say that all of that chaos is in the past. Last year, I attended a session on Proficiency with ACTFL presenter Laura Terrill. If you've been reading all of the previous blog entries about IPAs, you know how I feel about her ideas. She seriously changed my teaching and finally made the IPA interpersonal make sense. Based partially on her teaching and ideas I picked up previously, this is what I know do for my interpersonal tasks. See more detailed explanations further below.


1. I re-explain the scenario and the grading rubric to students before the task. This results in fewer questions and confusion and makes the process go faster, plus it's always good to remind students of how you're assessing them on the day of.

2. I carefully plan and clearly explain what students are working on while I'm assessing, but most often students work on the interpretive reading and presentational writing tasks.  Believe it or not, I can typically do the interpretive, interpersonal, and presentation tasks all in a 50 minute period for over 30 students. It can be done! Plus, I usually still do a warm-up. You could really do any individual task, but I find that the other IPA tasks work perfectly because it keeps them silent so I can focus on the assessment at hand. Some would say, however, that not all 3 tasks should be done on the same day. I'll stick with what works for me and my students.

3. I randomly pair up two students and I've never had students questions this practice. I set the precedent at the beginning of the year that my partner selection isn't a discussion or a debate. If I know the kids I randomly pick aren't a good pair, I usually just make a quick change and the students are none the wiser. As to the practice of pairing two students versus me having a conversation with a student, Laura Terrill claims that a teacher and student aren't a good interpersonal pair because the teacher inevitably will bail the student out while their peers won't. I've found I agree, but the best part about pairing two students is that I can kill two birds with one stone and I grade half as many conversations. Yay efficiency!

4. At Laura Terrill's suggestion, I give each pair 2 minutes to prepare. At first, I completely disagreed with this concept because I argued that it makes the situation not spontaneous. However, I decided to try it out and I love the effect that 2 minutes has upon my sanity.  Besides, I've found that 2 minutes isn't enough for students to memorize anything, but just enough to work out the kinks and get the interpersonal moving much more quickly and efficiently. While one pair is performing, another pair is on deck so things move smoothly. 

5. I grade using a rubric while each pair presents and provide feedback to each student on the spot. I've spent a lot of time revising and rethinking the grading rubrics I use to ensure I have the criteria I'm looking for and I'm really happy with this one. For the moment at least.
In the next post, I'll be discussing the presentational task and, while it is the area of IPAs that most teachers are most comfortably with, I think it helps to see some different examples.  Also, if you're interested in checking out some of my IPA units by thematic unit, please visit my Teachers Pay Teachers store:

https://www.teacherspayteachers.com/Store/Spanish-With-Sra-Shaw/Category/IPA-Thematic-Assessments-241264


May 17, 2016

How to Create and Give IPAs: Part 4: Preparing Students for Interpersonal Speaking


Understandably, students need a lot of practice to become proficient in interpersonal speaking. I've found my novice-level students need a lot of repetition, structure, and opportunity to develop interpersonal speaking skills, but I've found several tactics that have my kiddos chatting freely away.

1) I frequently do a lot of short, interpersonal tasks based on cultural images and videos. Below are a few examples that include cultural images and prompts, usually in English, but occasionally in the target language. After students speak with their tables or with their partners, I model questioning methods and allow students to ask one another questions in front of the entire class. This helps students develop a larger question bank and struggling students to hear the types of questions they can ask to achieve a task.


2. When I first discovered question ladders six years ago, they changed the way my students approached interpersonal tasks.  Unfortunately, I now have no recollection of where I got the original idea.  I've scoured the internet and looked through every WL pedagogy book I own, but whoever originally came up with the concept is my hero.  Novice-level students really need to be given question and answer frames throughout a given unit if they are going to successfully craft a conversation for the interpersonal summative assessment.  When I first started using question ladders, I typically gave them to students toward the end of the unit. This year, however, I've been providing them to students at the beginning of the unit usually conveniently placed on the back of their vocabulary charts for easy access. I've found that when I give interpersonal speaking practice prompts like those shown above that my students are more engaged and more confident with the question ladder.
Notice that in the question ladder above, my students are provided a sample question, but must construct their own answers and a similar question.  Students use the question ladders throughout the unit, but I find I see many of my students using them as a study guide so they're very versatile. 

Also, please note that I'm not usually a big fan of  talking about explicit grammar in the like in left column, but I teach in a large district that is largely not proficiency-based and I feel obligated to ensure my students know the grammatical terms that many of their teachers will use in the future.  If you'd like to try out some question ladders with your students, all of my unit IPAs come with them, plus a whole lot more.

3. Now, let's get to talking about ways I let my students practice interpersonal speaking before the unit assessment. You saw the example prompts in the first bullet, but I often like to give my kids the opportunity to practice conversations with lots of their peers so they get a feel for the way different people approach a conversation.  My favorite speaking activity is called speed-dating, an idea I think I originally got from the Creative Language Classroom.  I'm kind of a classroom management nut, so I always spend a few minutes reviewing the rotation and after a few times, they've got the hang of it.  They know to move when I shake the maraca and that if they finish the conversation early, they should start the conversation over in a different way.  In my classroom, the rotation looks looks like the image below, but there are lots of different ways to get the same effect like inside-outside circles.

4. Finally, if you've never had the opportunity to attend a session with Laura Terrill, renowned language educator and ACTFL presenter, I can't recommend it enough. I've been fortunate enough to hear her twice in the last 18 months and she really made an impact upon my teaching.  She has an a ton of easy-to-implement practices for interpersonal speaking in the classroom and you can read about them here.  One of my favorite of the many ideas she taught to make the interpersonal task manageable is the TALK score concept shown below. 
While she says it shouldn't be overused, I find myself assessing students with TALK scores maybe 2-3 times monthly to hold my students accountable and to set expectations. Students know they will be assessed on how well they meet the four requirements and I usually give 1 point per criterion for a participation grade.  I always keep this graphic up on the projector as a visual reminder to kids that they're being assessed with a TALK score. 

I hope you got some great ideas for practicing interpersonal communication in your classroom. In the next post, Part 5: Managing the Interprsonal task, we'll move on from practicing speaking to the actual interpersonal IPA task. I'll be giving lots of tips about how to design the scenario, assess effectively, and manage students.  So you are sure to catch the next post, please take a moment to subscribe to my blog using the "follow by email" section in the right sidebar.

May 13, 2016

How to Create and Give IPAs: Part 3: Preparing the Interpersonal Task


The interpersonal is by far the most daunting and complex of the the three IPA tasks, in my opinion.  I hear a lot of complaints about how the interpersonal takes too long, how they are dreaded both by students and teachers alike, and how they are a classroom management nightmare. Additionally, there seem to be many misconceptions about what the interpersonal should look like.  Though my heart was in the right place, I've made a lot of mistakes with this task in the past. Thankfully, through lots of reading and professional development from the likes of Laura Terrill and the Creative Language Classroom, I've gotten to the point where my students and I enjoy the interpersonal and I can see distinct growth  in their communication abilities.  I'm excited to share some tips and tricks for creating and giving interpersonal assessments in my next couple of posts.

Here are the three most important things I've learned about the interpersonal task:
1. There needs to be an exchange of information. Contrary to popular belief, it doesn't involve just answering questions. In the past, I was known to put written questions like ¿Cuántos años tienes? on a test and call it day. There has to be some sort of 2-way communication, which may be either written or spoken.
2. Interpersonal tasks must be spontaneous. I was never much for skits anyway, but a skit is really a presentational task because students perform memorized scenarios. Let's say, for example, that I want my students to show competency for the ACTFL I-Can statement, "I can order a meal." It's extremely common to have student do the ever-famous restaurant skit, but this would technically need to be the presentational task.  I personally am of the belief that my students and I could brainstorm appropriate questions and exchanges for ordering food in a restaurant and have them practice with peers, but the performance task itself would be spontaneous.
3.  Interpersonal tasks need to sound like a conversation.  I've been in several districts where the interpersonal portion of final exam involves me interrogating students by asking them 3 random questions they were given on a list to memorize.  This is actually still the practice in my district and I'm hoping it changes really soon.  Students need to learn how to negotiate the language and how to make adjustments when they don't understand. If I'm asking them questions and all they have to do is answer, none of this happens.

I recently came across this amazing graphic from the Ohio Department of Education in their publication Evaluating Oral and Written Communication. Since I'm a Michigan native, I've been raised to generally dislike our neighbor to the south, but the Ohio Department of Education has got it going on. Seriously. Their documents for World Language are downright inspiring. Anyway, back to that graphic:

I think that this T-chart does an incredible job explaining the goals we should be setting for our students.  In previous years, I've been guilty of several of the no-nos listed above. In fact, I actually recall a stage in which I encouraged strict turn-taking and I didn't care if my students ignored their partner's communication until very recently.  At the same time, grading interpersonal tasks used to be downright painful.  I used to dread them more than anything.  More than the dentist. More than the timed mile in middle school gym class. Yet somehow, I've come to really enjoy watching my students do their interpersonal tasks and it's all because I changed my expectations and the way I prepare for this assessment piece.

For my next post, Part 4: Preparing Students for the Interpersonal Speaking,  I'm excited to share with you how preparation, grading methods, and careful planning can make the interpersonal task manageable and even gratifying.  So that you can be sure to read the rest of this series of IPAs, please take a moment to subscribe to my blog using the "Follow by email" section in the right sidebar.


May 11, 2016

How to Create and Give IPAs: Part 2: The Interpretive Task


The first, and arguably most important aspect, of the IPA is the interpretive task. It's not that the interpretive is the most difficult or worth more points, but that the other two tasks should be based upon the authentic resource used for the interpretive. Unfortunately, it took me about 5 years to get this part right.

In the beginning, when I didn't know any better, I would create my own interpretive tasks. I used to literally create a task and record it or, if I was feeling extra authentic, have one of my native speaker friends record it for me. My current WL district colleagues reading this are probably gasping in shock and disgust after reading this paragraph, but it's true. My early interpretive tasks were were created by me, a non-native speaker for non-native speaker, which violates one of the most important proficiency rules:


So, where do you find these authentic resources?  They're all over the internet, but they can be difficult to find. I've spent literals days of my life searching for the perfect video clip or infographic for my interpretive tasks, but in the last year or so, I've gotten much more efficient.  My favorite places to find authentic resources are:
  • Pinterest- I'm a pinterest fanatic and you now how access to all of my professional and random personal boards. As you can see, I create separate boards for all of my units and save resources to them as I come across them. Click the link above to check them out. Feel free to follow me!
  • Twitter- I'm so mad at myself for not getting into Twitter earlier because it's amazing professional development. Try searching #authres (authentic resource) and even your topic. Ex. #pasatiempos
  • Youtube- I love pairing a short video clip, especially commercials, with an infographic to make a well-rounded interpretive assessment. Try searching in Spanish for topics you like. Ex. madrid turismo. 
  • Google Images- It sounds overly simplisitc, but it works! Try searching infografica and the Spanish like familia. You'll be surprised by how much you'll find with the right search terms.

Once you've located one or two related authentic resources, it's time to get started creating your interpretive task.  I usually go through the following steps:
1. Look over your authentic resources and try to decide what they have in common.  As an example, let's look at two resources I use for a Spanish I family unit.  After looking around on YouTube, I found a really cool Chilean home store commercial that talked about different types of families, which tied in perfectly with the infographic I found about different types of modern Mexican families. See both below.


2. Create a scenario. Decide what your scenario is going to be for your interpretive, interpersonal, and presentational task. Here's an example. Doing so will really help to tie your IPA together into a hypothetical task and ties in I-Can Statements.  The interpretive task is the "you'll need to learn more about families in Latin America." As you saw above, students will watch a video and look at an infographic.


3. Using the authentic resources, decide what you want your students to do. This amazing resource from Ohio is my constant go-to because it gives such diverse ideas of the kinds of comprehension tasks.  Below are a few of the activities my students completed with the authentic images.

https://www.teacherspayteachers.com/Store/Spanish-With-Sra-Shaw/Category/IPA-Thematic-Assessments-241264

So, there you have my steps to creating a successful interpretive assessment. One aspect I'd really like to point out is that the focus on the interpretive assessment is for students to be able to decipher texts they've never seen. When I first moved in this direction, my students questioned why they were being assessed on information they'd never been taught. It's important to lay out to students that in real life using a language, they will need to use what they already know to correctly interpret new information. They'll need to use context clues, visual cues, etc. to understand new situations. That being said, it's really important to expose kids to lots of authentic texts and formative interpretive tasks on a day-to-day basis so they are used to the challenge.


Finally, to check out my complete thematic IPAs, please click here! I've worked really hard to make them useable for both experienced IPA teachers and those new to the concept. They come with I-can statements, performance goals, preparation materials, student prompts, rubrics, answer keys, and even student samples.

https://www.teacherspayteachers.com/Store/Spanish-With-Sra-Shaw/Category/IPA-Thematic-Assessments-241264

Check back tomorrow for the Part 3: How to Create and Give IPAs: Preparing the Interpersonal Task, which tends to be the most challenging both for students and teachers. I'll be giving lots of tips and tricks to make them efficient and painless and, most importantly, to get students having awesome spontaneous conversations!

May 10, 2016

How IPAs (Integrated Performance Assessements) Transformed My Language Classroom: Part 1


When I first started out teaching and for several years after, like most veteran teachers, my tests were based purely on vocabulary, grammar, and random textbook cultural knowledge. I spent a lot frustrated hours grading and using up a ton of purple ink marking kids down for misspelled conjugations and nit-picky grammatical details that don't really matter in the long run.

Subsequently, I spent a lot of time feeling guilty for submitting my early students to this type of "assessment" method.  I try to remind myself that I was only using the practices that I experienced in high school and college and observed in my student teaching. I didn't know any better.  I'd never seen or experienced perfomance-based assessment. The only way I knew how to test my kids was to mark wrong what they didn't know and neither my students nor I learned much from these tests except that 1) I had failed to teach them well and 2) they hadn't learned the material.

When I was first exposed to IPAs and performance-based assessment mentods in the beginning of my 4th year of teaching, I was understandably critical. I was being told I was required to give IPAs, but given no training or professional development in what they were, how to make them, or how to give them. This was in 2008 before the popularity of blogs, Pinterest, Twitter, or Teachers Pay Teachers. To my knowledge, even ACTFL wasn't yet publishing much about IPAs.  All of my district information about these mysterious assessments was delivered via email and I was the most experienced of two language teachers at my school, which obviously isn't saying much. Let's just say year 4 was rough in the curriculum department and that the learning curve was steep.

I had to relearn, mostly on my own, how to be a Spanish teacher and the transition was painful and yet incredibly rewarding. I quickly realized that the units I was required to teach didn't match up with anything in the textbook, rendering them useless.  Once I started creating and giving my own scratch-made IPAs, I found that I also had to throw out a lot of my previous instructional practices because they didn't get my students to the necessary proficiency goals.  It was a mess, but it was gloriously exhilarating.

When I look back now at my early IPAs, I cringe a little because I broke a lot of what I would now call "proficiency rules." However, I've been refining and improving my tricks to making an effective IPA for almost a decade (how can it have been that long!?) and I'd really like to share some of them with my fellow language teachers so you don't have to go through as much trial and error as I did! This is just the first of a series posts dedicated specifically to integrated performance assessments.

Click here for the next blog post, Part 2: How to Create and Give IPAS: The Interpretive Task.  I'll be discussing how to create an IPA, actually give them to your students (this is more complicated than one might think), tips and tricks, things to avoid and more. I'd also love it if you'd follow me on social media, subscribe to my blog using form on the right sidebar, and comment below so we can have a collaborative conversation about integrated performance assessments.

Finally, please check out my Spanish I IPAs here! I've worked really hard to make them useable for new-to-IPA teachers and they come with I-can statements, goals, preparation materials, student prompts, rubrics, answer keys, and even student samples.


March 15, 2016

EdTech & Web 2.0 in the World Language Classroom Day 2


Today was my second day at the MACUL '16 Conference and I my focus for today was to learn more about newer topics as I tend to pick sessions I have an interest in and then don't learn as  much.  For the most part, I was successful as I learned new ways to help my students connect and collaborate with the world at large.

My first session was a keynote called "Let Them Be Heard... Givings Our Students a Voice" with Shannon Miller, renowned Teacher Media Specialist. Instead of focusing on the how-to of technology, which is what usually interests me, her keynote presentation was much more of a anthropological discussion about the impact of giving students a voice.  Shannon's approach to having students use social media tech tools (Skype, Twitter, etc) to engage with authors changed the way they interacted with the world.  
Watching Shannon's students interacting with easy-to-access tools left me wondering why I shouldn't be engaging my students with Spanish-speaking people and different cultures in a similar way. Why shouldn't I do that?! It wouldn't cost me anything to do so and we have the technology on hand.  Using Twitter, it shouldn't be particularly difficult to find people with whom to connect on Skype.  Moreover, chatting with students in Latin America would be the perfect way to have my students interact with the world and hit ACTFL World-Readiness Standard 5:


I spent the rest of the day redesigning my session selections with hopes of finding tools to connect my kids with world. Luckily, one of the options was with the amazing Leslie Fisher.  I'd already seen much of her "Web 2.0 Tools You Might Not Know About" session last August, but there were a few new items that peaked my interest. Last year, after her session, I immediately implemented SeeSaw, EdPuzzle, Go Formative, and Quizizz and I LOVE using them with my students. (Blog posts to follow about each of these tools)
 

One of the new 2.0 tools Leslie demonstrated is called Appear.In.  Basically, it allows you to video conference, but in a way somehow cooler than with Google Hangouts or Skype. I'll be playing with it more in the future in and I'll get back to you, but I'm basically planning to have my kids use it for interpersonal speaking practice hopefully with a native speaker. Tracy, our awesome media specialist, volunteered to help me test it out.

In the meantime, however, I decided to make a fool of myself and get called out by Leslie in front of at least 500 people by taking a picture of myself as I appeared on Leslie's projected Appear.In video conference. See photo below for the embarrassing evidence.

Before she wrapped up, Leslie talked briefly about Google Tour Builder.  I've used a much-loved Google Maps lesson for years with my 7th graders, but when I used my lesson last fall, it was a fail because of some Google-based technical issues.  I haven't really played with it since, but my kids always loved immersing themselves in language and geography of Mexico City and Oaxaca.  Watching Leslie demo Google Tour Builder motivated me to bring this lesson back in a cool new way.

What I really like about Google Tour Builder is that instead of just wandering around aimlessly on Google Maps Streetview, Tour Builder makes the experience much more streamlined and organized. I've only played with it for 20 minutes and I'm already halfway through what I hope will be a much more engaging lesson to explore México D.F.  Here are some of my favorite Tour Builder features:
  • Guide students to a list of locations you want them to visit. 
  • Add directions, annotations, and comments for each location if desired. I think this is great for helping students know what you want them to do in each location.
  • Import photos and videos for each location from Google, YouTube, or upload your own.
If you're doing a city unit or just want to get your kids acquainted with México D.F., feel free to check out the TourBuilder lesson I created. I'll be making an accompanying handout this week and I'll link here as soon as I'm done. Below is an image of my new Tour Builder link.


March 10, 2016

EdTech & Web 2.0 in the World Language Classroom Day 1


As any of my colleagues, family, or friends will tell you, I'm a complete technology junkie.  It's true in my personal life (much to my husband's dismay), but nothing is better than when I get to combine tech with my love of education, curriculum, and, of course, world language instruction. On any given day, my students and I probably use more than a handful of tools both inside and outside the classroom, but learning about a few more is always exciting.

I plan to write a blog post at a later date about how I gradually fell in love with educational and instructional technology, but for right now, I thought I'd write about all of the awesome tools I'm learning about right now while at the MACUL (Michigan Association for Computer Users in Learning) annual conference in Grand Rapids, Michigan. I'm here with four of my favorite colleagues and I'm loving the opportunity to immerse myself with almost 5,000 fellow educators who share a common interest.

This morning's keynote speaker was Jaime Casap, Chief Education Evangelist at Google. First of all, how cool is that job title?! Chief evangelist?! Awesome. Besides having an incredible job title, Jaime's presentation got me thinking about the way I view and use technology in my classroom and the way I ask kids to use their tools. I loved the way he presented his message about the implications of technology on the futures of our students and even though I try to stay relevant with technology, that I need to use the tools they are using.  Perhaps my favorite quote to put it in perspective was this:


After the keynote, I attended a session called Twitter for Power Users with  Leslie Fisher, all-knowing tech guru. Last August, I had the opportunity to attend four of her sessions and I immediately implemented many of the tools she introduced (most notably SeeSaw and Go Formative).  I don't consider myself a master of Twitter by any means, but I got a lot better after last fall after learning that Twitter is THE place for professional development for teachers. My favorite, as a Spanish teacher, is #Langchat, but Leslie told us that there are over 180 educator chats that occur every week. If you haven't checked out a chat, Twitter might just be the best PD venue you didn't know existed.  Plus, if you're like me and crave constant professional growth, you can connect with like-minded colleagues both locally and around the world.  Next week, I plan to virtually attend my state chat, #MichED, to hear what my fellow Michigander teachers are talking about. 


After a luncheon with the Multimedia Special Interest Group (MACUL SIG-MM), I went to a session entitled, "Never Buy Another Posterboard: Digital Creation and Publishing." Even though sometimes I feel like I flood my 8th grade students with tech, I still do posters and I'm dying to move away from them for the most part. For instance, I teach 6th grade 8 times throughout the year and I am completely over my classroom being taken over by family tree posters every nine weeks. I've replaced some of my projects with Padlet assessments, so when I found out about a similar tool called Linoit today, my attention was peaked. At first glance, Linoit looks very similar to Padlet, but there appears to be an emphasis on incorporating audio and video into the digital poster.

The other thing that struck me in the digital creation session was ThingLink.  I learned about it last summer and thought it would have implications for WL classrooms, but totally forgot about.  Basically, it allows you to take any image(s) and add audio, video, text, hyperlinks, and more to it to make the graphic come alive. I think this would be so cool for classroom activities and even presentational speaking assessments.  Here's one I found that would be perfect for my 7th grade or even beginning 8th grade units.  Just click the images to make them come alive and keep in mind you can embed both audios and video.  

¿Cómo es? 


All in all, my first day of MACUL 2016 was a both motivating and interesting, but perhaps the best part was being surrounded by people who are as excited about educational technology as I am.  After a long (and slightly overwhelming) day of learning, my four coworkers and I headed to Brewery Vivant to try new foods and drinks (including a bone marrow appetizer with bread) and discuss the best of everything we learned.  Technology and fun colleagues are a great combination, especially when paired with delicious culinary experiences. Stayed tuned for the next blog entry about day 2.

February 22, 2016

Infographics as Presentational Assessments


¡Hola! I spent all of last week off from school for mid-winter break. Yes, the whole week off! I'm very lucky, I know. I mostly relaxed, refreshed, and caught up on my DVRed favorite shows, but I got a really exciting email during my vacation that has me so excited to see my students!

Image property of
Creative Language
Class via Piktochart
In early January, Megan and Kara from the Creative Language Class, my absolute favorite World Language blog, announced an infographic contest they were hosting with Piktochart. If you haven't checked out the Creative Language Class blog or played around with Piktochart, I can't recommend either enough. I've been following the CLC blog since 2010 or so and I owe a lot of my philosophy about WL instruction and practice to these ladies. Needless to say, I'm a big a fan because they're so inspiring and make the transition to proficiency-based instruction so much more manageable.

When Megan (fellow Michigan native) and Kara announced the contest, I thought to myself, "Technology and competition?! My two favorite things!" I immediately got started trying to figure out how I could incorporate a Piktochart presentational assessment into my curriculum. Thankfully, the timing was perfect because it was nearly the end of first semester and I was quite ahead with my 7th grade students, who were finishing up a food unit. I had yet to frame exactly what I wanted the IPA (interim performance assessment) to be, but the Piktochart seemed the perfect culminating assessment for my group of very diligent, creative 7th graders. Seriously, this group of kids is just plain impressive and you're about to see some prime examples of why.

I spent several hours framing out a scenario, guidelines, and grading rubric for the assessment, which wasn't easy because I had never done an infographic project and I wasn't sure exactly what I was looking for. I decided to go with a food truck scenario and laid out some authentic resources my students could use to research common foods in their assigned Spanish-speaking countries. I LOVE how the infographic project I created turned out and I'm so happy to be able to share it with you on my Teachers Pay Teachers store.

Plus, Megan and Kara gave me some great positive feedback about how I framed the scenario (see below)!
The Process
I've got a Master's in Library and Information Science, so it was really important to my that my kids used primary sources, but the Spanish teacher in my wanted there to be 1) interpretive practice in the target language and 2) as little translator use as possible. I gave my kids a graphic organizer to help them categorize and note-take and that seemed to help guide their work, which really seemed to help.

The whole process from start to finish took about seven class periods.  I know that's a really long time, but I had extra because this group of students was so exceptional and I felt this was a really worthwhile venture.  When finished, students emailed me a link to their Piktochart and I was blown away by so many of the 33 infographics I received, especially considering the novice-mid level of my 7th grade students and the fact that they were working with a new tech tool.

My student teacher kindly helped me narrow down the a top five and then the two of us worked to select three to submit to Creative Language Class.  Can you believe that two of my kiddos' work was selected for the top five? I will absolutely be doing this and other infographics with Piktochart in the future.  Without further ado, below are the three submitted.


Aren't the samples above AMAZING?!  Would you ylike to let your kids try out making an equally impressive food menu on Piktochart using my project and rubric? Check it out here:

https://www.teacherspayteachers.com/Product/Spanish-Food-Project-La-Comida-Menu-Infographic-2471654